Thursday, March 10, 2011

Cinnamon Roll


I am craving for cinnamon, dun ask me why,
cos i just crave, especially when i saw that bottle of ground cinnamon on offer!
I have been searching for a cinnamon roll recipe for some time already.
I tried making a batch on monday night,
but that batch blotched, cos i didnt have enough milk left.
So naturally on tuesday,
i refill the milk and started to make a new batch.

Due to the long waiting time for bread,
as i've said in my previous post.
I have search high n low for one that is complete-table within one day,
more specifically, within 3-4hrs after i'm off work!!!

I've came across some recipe that call for mashed potates,
but didnt want to have to waste further time on that, i skip those.
In the end, i have shortlisted a few with just simple ingredients.
I started with the recipe on Pioneerwomen, but failed on monday, all faults purely mine.
Then on tuesday, i wanted to try another one,
but then decided against it.
So eventually i went back to that original recipe.
For, it doesnt contain any eggs, thus chun's mum will be able to take it.
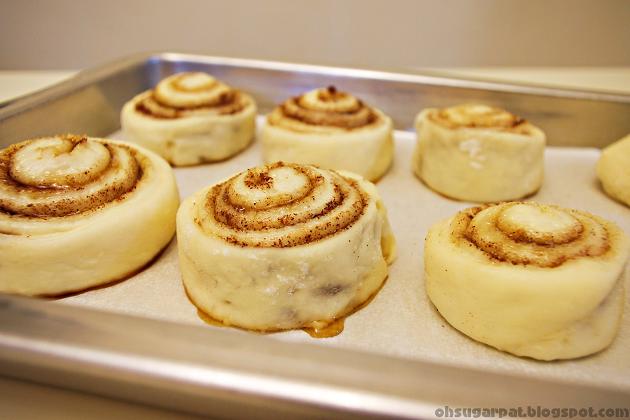
The roll turn out beautifully, taste close to commercial ones!
Best of all, its entirely bakable with that span of 4hrs of time i have left after work!

Cinnamon Roll


Ingredient
1. 470 HL fresh milk
2. 1/2 cup olive oil
3. 7g instant yeast
4. 4 cups plain flour (plus 1/2 cup more seperated)
5. 1/2 tsp (heaping) baking powder
6. 1/2 tsp (scant) baking soda
7. 50g soften butter (spreadable)
8. 1 cup sugar( i use a mixure of brown, castor & muscavado)
9. very generous sprinkling of cinnamon

Procedure
1. Bring the milk, sugar & olive oil in a pan to to stimmer (just before boiling point)
2. Turn off heat and let mixture cool
(i cant wait, so i put it in a cold water bath to bring down the temperature,
what we want to acheive is to create a nice n warm temp for the yeast, so lukewarm will be good)
3. Sprinkle yeast into the lukewarm mixture & let stand for 1min.
4. Meanwhile measure out 4cups of plain flour, stir mixture (should be very wet, mixture like),
leave it to rest covered for at least 1hr or until double in bulk.
5. After rising, add in the 1/2 cup flour, baking powder, baking soda & salt.
6. Transfer dough to floured surface & knead for 2-3mins.
7. Roll out the dough into a rectangle.
8. Spread the soften butter all over the dough, leaving 1" space at the furthest long side of the dough, the side that the roll ends.
9. Sprinkle the 1 cup of sugar evenly & sprinkle generous amount of cinnamon.
10. Roll the dough from the nearest end as tight as possible, at the end of the roll, pinch the seams to seal the ends.
11. Using a long strand of dental floss, cut the roll with a criss-cross action.
12. Pleace the cut rolls on baking tray line with baking paper, let roll rest for another 30-45min, or until it puff up to almost double in size.
13. Bake in a preheated oven at 180C for 17 mins, or till golden brown on top.
14. To make the glaze, combine 1/2cup icing with 1tbsp melted butter & 3 tbsp milk, beat the mixture till thick but still pourable.

a little variation, with mini choco chips


Note:
The individual roll bake faster at 17min, while those i laid in cake tin bake slightly longer for around 25min. Muscodavo sugar also causes e sugar to melt during the rising prior to baking, the 2nd time i tried w/o that sugar, didnt melt that much. If drizzling glaze, i'll reduce the sugar content within the roll.


Afternote:
The roll is very soft on the first night, the next morning it's still soft, on the second morning, it's considerably harder, but still ok.

Tuesday, March 8, 2011

Herb Garlic Knot


Made these knot last friday.
I was on MC that day, thus explains the time i have to kill, lol..
Was pretty bad with flu.
But still it didnt deter me from making those lovely bread.

It have been a long time since i made bread.
Cos of the time constrain mainly.
In my Uni days, i still have days without classes thus the time for bread.
The best part of making bread is the shaping part,
& after that seeing the dough rise to a puffy & yellowish white tender beautiful roll.
The puffing is so magical, the outcome never fail to amaze me still.
I love to see the rolls/bread puff up, don't ask me why, i just do.

This recipe doesnt need much kneading,
actually no kneading is required!
Just mix the ingredient, leave it to poof,
then punch down and cut into segments, roll into long strips and make the knot.
Leave it to poof again and brush with prepared butter & bake & wala!!!

Herb Garlic Knot

Ingredients
1. 480g bread flour
2. 1 tbsp sugar
3. 2 tsp (7g) instant yeast
4. 11/4 tsp salt
5. 2tbsp (30ml) olive oil
6. 60ml milk
7. 1cup + 2 tbsp (270ml) lukewarm water

Glaze:
1. 2 clove garlic
2. 42g butter
3. 1/2 tsp italian herbs
4. 1/2 tsp dried basil leaves

Procedure
1. To make dough, in a mixer bowl fitted with paddel attachment,
2. Combine the wet ingredient (Olive oil, water, milk) into the dry ingredient with
the paddel attachment on med speed for 8min.
3. Transfer the dough to an oiled bowl with enough space for it to rise & double,
cover with clingflim and let rise for 1hr or until double in bulk.
4. Punch down on the dough and transfer to a lightly floured surface.
5. Divide the dough equally into 8 pieces.
6. With each pieces, roll it between your palm and the table till 10" long rope.
7. Make sure that the rope like dough is sufficiently floure so that they dun stick,
tie a knot with the rope, tuck both ends into the middle of the dough.
8. Repeat the remainding segment and let dough rest for another 45mins.
9. Meanwhile prepare the glaze by mincing the garlic and mix into melted butter with herbs.
10. Brusht eh glaze on the dough after 45min of resting,
bake in preheated oven for 15min at 170C & 3min ar 180C.


Afternote
the bread is not the usual soft sweet bread we normally eat in asia.
The texture is more towards bagel, moderately hard bread that is suitably for dipping or sandwich. Dun think i'll like to eat it as itself, but as a sandwich bread it tastes great with
slight hint of garlic and herbs.

Wednesday, March 2, 2011

Happy Pasta for 1


This is mainly what i've been having for the past 2 weeks.
Of course not everyday,
but these ingredients are sitting ready in my fridge.
And i cook myself up these lovely pasta whenever i want.
My maid have been having it easy lately,
doesn't need to prepare dinner.
I prep & cook it myself.
(But she does the washing)

Someone taught me this recipe.
We didnt even need tomato sauce for this!
The base for the sauce is fresh tomatoes.
Just shopped and stewed on a pan, mixed with plenty of aromatic basil.

I love this recipe,
for we can easily use any ingredient we have in the fridge.
It's a fairly simple recipe that calls for anything u loved to go with any type of pasta.
Initially i'm having this will tagliatette, then i tried fussili.
I still prefer the former, guess i'll try it with spagetti next time.

The steps are easy peasy,
I used mushroom, hell lots of them (portabella or button),
baby asparagus, capsicum (i like red ones) , baby carrot (so cute & sweet).
All slice or diced.
Then for 1 person, i dice up one large tomato.
Cook the pasta according to instruction,
while sauting the mushroom, carrot & capsicum.
Cook the diced tomatoes with a pinch of basil or italian herbs,
top up with asparagus, cook till the tomato is soft and easily mashed.
Mixed all the cooked ingredient together, viola!

Slice / diced all ingredients
Cooked diced tomato til soften & easily mashed

Saturday, February 26, 2011

Mini Blueberry Yogurt Muffin


Last week, i bought a box of blueberries from Chile.
So that i can have a hearty granolar breakfast with the so-thought sourish berries.
Been missing the self picked blueberries that i had for breakfast
while i'm staying with Gerd at Sweden.
Those small yet power pack delicious sourish berries that
she handpicked them in the summer behind her house and freeze for use during winter.
She make swedish pancake for us during one dinner,
and we had handpicked blueberries, cloudberries, homemade rhubarb & lingon berry jam
to go with the pancakes!!! Absolutely D-E-L-I-C-I-O-U-S!!
To further side track, i love love love the pink homemade rhuberb lemonade!! ahhh...

Back to my own store bought blueberries.
The berries that i bought are called blueberries, no mistake.
But they so absolutely doesnt taste like what i had in Sweden.
Firstly, they're NOT sourish at all, not a tint at all!
They're big and plump, unlike the skinny wild blueberries.
Instead, i think i taste a hint of sweetness in it.
I dunno is its due to the different species,
what i bought was called 'Southern Sun' from Chile.
So, i don't really like it with my yogurt nor with my granolar...
So instead i made them into muffin for today's breakfast.

Didnt have enough berries to make a standard 12 muffin,
so i make them into mini muffin.
This time round, i didnt use the staple muffin recipe that i love from Nigella.
Instead i tried a new recipe from a book that my colleague got for my bday last yr!
It didnt turn out too bad.
The muffin is soft and fluffy with a sticky top developed overnight.
BUT, it turns out that the blueberries baked, is nothing short of nice.
Maybe its due to the sweetness of the berries.
You dun get the usual sourish taste from the fruit while eating the muffin.
Maybe this will be a good species for baking.
I still miss the smallish sour berries that i had for dinner
and a few days for breakfast, exactly a month back!


Mini Blueberry Yogurt Muffin

Ingredients

1. 180g Plain flour
2. 1tsp Baking powder
3. Pinch of salt
4. 125g Unsalted butter, soften
5. 100g sugar
6. 1 tsp lemon zest
7. 2 egg
8. 90g yogurt
9. 150g blueberries

Precedure
1. Preheat oven to 180C.
2. Conbine flour, baking powder & salt in a bowl, put aside.
3. Mix butter and sugar till pale & creamy on med-high setting.
4. Mix in the eggs, one at a time till just combined.
5. Mix in the dry ingredient on slow setting.
6. Add in the blueberries by hand.
7. Transfer to miffin pan line with linear, fille ach muffin holes to 3/4 full.
8. Bake for 20-25min, til golden brown and cooked through.

Wednesday, February 16, 2011

Chocolate Chips Cookie


Its been exactly 2 months since my last post.
Alot of happen & taken place during these 2 months.
I went on a mind-changing or better said, self-engaging trip to the far far North.

Trying hard to get back on track to my baking routine.
Life resume after all the hu ha of holidays & CNY doesnt it??
This is the 1st yr since my poly days that i have not baked
pineapple tarts & other goodies for my dear family.
I apologize for failing to keep this up this yr.
This is an exceptionally contridicting year for me.
Had wanted to make almond tuiles when i came back on the 3oJan,
but was seriously jet-lagged and simply not in the correct mind to bake.

These Chocolate Chip Cookies are bake specially for xmas last year.
I try to get back the 'original' taste of these cookies.
These are actually the first few items i bake when i started out baking in my sec sch days.
Bought back the same flour, which i'm not using right now, specially for this batch.
Used back the same brand of butter, the same brand of choco chips.
I gave most of them away, to people whom are special & dear to me.
My mum & james loved the macadamia cookies.
I still have hell lots of mac nuts, have to bake another batch to finish them up soon.

This is a very very simple recipe,
the basic of chocolate chip cookies.
Nothing special or unique used for these cookies.
Its the mind & heart of the baker that makes the real diffference,
not the recipe.
I always enjoy the crunchiness, the aroma, the bite
& probably the memories that these cookies had for me.
I hope everyone could enjoy the simple pleasure & happiness
that this simple recipe brings!


Chocolate Chip Cookies

Ingredients
1. 500g Self-raising Flour
2. 320g Butter
4. 200g Sugar
5. 1/2 tsp Baking soda
6. Pinch of salt
7. 2 eggs

Procedure
1. Preheat oven to 180C.
2. Cream butter & sugar till creamy, add eggs & continue to mixed.
3. Combine with flour, salt & baking soda.
4. Bake the dough for 10mins depending on size.

*add in chocolate chips, nuts, cocao powder as required.

Tuesday, December 14, 2010

Know your apples


Stumble upon this, found it very interesting.
So here it is, toremind my self next time when i wanna bake with apples.

Bake a batch of cookies last sunday.
But didnt take any photo of it.
Its the 1st few recipe that me & Cat bake when we started out
baking in our sec school days.
Recipe is still as good, so is all the memories when baking them.
I even went out to get the flour i used last time,
which i don't use nowadays,
so that i can get the taste back.

http://www.foodsubs.com/Apples.html

Thursday, December 2, 2010

Cheesy Bacon Biscuit


This is the first time i made savory biscuit.
When i came across this combination few weeks back.
It actually 'feels' weird to me.
Having cheese as part of the ingredient was still ok,
but we're talking about BACON!!!
Bacon in a biscuit.
How weird can that be?

After a few weeks,
i was revisting some of the blog i visir regularly,
when i see this recipe again.....
I look thru the ingredient list, try to imagine how it would come out.
It still bothers me that i'm making biscuit with cheese n bacon it in.
Not to say that the price for these 2 beloved commodities
are price highly here.
I went on to get the 2 main ingredient,
and head back home to try out the recipe.

I didnt follow the recipe to a T.
It called for good matured cheese.
I'm afraid that the cheesy-ness will overpower,
and my whole family will not eat it.
So i bought a mild chedder instead.
That, ends up to be a huge mistake.
Should have stick to a matured chedder.
Cos after cooking, the cheesy-ness was all gone...
All its left with, was a light tint of cheese,
a little saltiness from the bacon.
It was enough for me,
but apparently, my entire family thinks its too BLAND...
Yes, even my mum, who hates BACON.

Cheesy Bacon Biscuit

1. 150g bacon (try to use those with lesser fat)
2. 260g Plan Flour
3. 18g Baking Powder
4. 1/2 tsp Salt
5. 1/4 caynne pepper (i didnt have so substitute with crushed black pepper)
6. 75g unsalted butter (plus a pinch of salt)
7. 250g mild chedder (use a strong one for better taste)
8. 250ml milk

Procedure
1. Fry up the bacon on the pan till crisp,
using a knife, chop it into small bits (this is the difficult part, if u use streaky bacon with alot of fats like i did, u'll have a hard time trying to cut thru the fats)
2. Grate the cheese with a grater.
3. Using a pastry cutter, combine the flour, baking powder, salt & pepper till crumbly.
4. Stir in grated cheese & bacon.
5. Add the milk and combined to form dough.
6. Transfer to a floured surface, knead the dough 4times, DO NOT OVERKNEAD.
7. Roll out dough to 1cm thickness with a floured rolling pin.
8. Cut into shape with 2cm cutter or with knife into triangle (as i did here)
9. Bake in 200c preheated oven for 15min or till edges are golden brown.

Afternote:
The biscuit taste better straight out from oven, slightly crispy.
The next day, it have loses all its crispiness.
Si i smear some cream cheese on it to eat it with.
Due to the fact htat i use mild chedder, the cheese taste was very light.
Didnt think we enjoy savory biscuit very much,
so i still think bacon are better off with pasta, mushroom & pizza!!!

Thursday, November 25, 2010

Herb Chicken w Sundried Tomatoes Wrap


Back in action after a good 10days short trip to Melbourne & surround.
Actually i was back on the 14th, night.
I took another week of rest, for my mind... haha..

It was a good trip.
Many first time was spend there.
The scenery AMAZING, sky so blue i didnt know it exist.....
Enjoyed the relaxed schedule that i had plan for me & darling.
We went mostly as per i have planned,
except that we miss out 1 attraction in Cape Otway.
Partly due to us, sleeping in late on our first sleep in the camper.
So much so for reminiscing....
I already am missing the pasta we had in mornington,
the cool breeze, the empty places that we get to have it for ourselves etc etc.....

Enough of lazing & holiday mood.
So i decided to tempt myself into my baking/cooking mood once more.
I went down to Tanglin Market Place.... hahaha
Where else to start me all over, other then a good fabulous market!

So i bought many stuff there, spend a good 1hr in the supermarket,
casually shopping around for the anything that jumps at me.
I bought plenty of cheese, sundried tomatoes, flour, granola etc......

So my first project was actually Cheesy Bacon Biscuit which i did on Tuesday.
But then didnt have 'inspiration' to take photo.
So i waited till today morning then take.
But, i was so excited bout my delicious wrap, i decided to blog bout that first..

Its a simple tortilla wrap,
with herb chicken i marinated the night before,
tuscan salad tossed with olive & lemon,
a rew leftover bacon from the biscuit,
and lastly, chun's new love, sun dried tomatoes.

I told him i had bought sundried before,
but then, he didnt like it.
Just cos he tried it in a nice pasta dish in mornington,
he suddenly thinks "sundried tomatoes very nice hor??"...
Isnt it amazing, how important the manner it is to introduce new food to ppl,
much less children.
That we have to inttroduce it in a manner that they like / favor.
This is something i ought to remember,
incase i wanna introduce more fruits/veg to my future children.

Anyway, so i make an effort to marinate the chicken fillet
the night before with some herbs, olive oil & a dash of soy sauce.
In the morning, i just toss the salad with the dressing,
warm up the tortilla, fry the bacon, assemble, top with up plenty of cheese & WALA~
Nice & filling breakkie!
I love making stuff for chun to eat,
seeing him enjoy the food i make, there's such great satisfaction.
I told him, my perfect life shall be like Bree's in Desperate Housewives.
Baking, cooking 3 meals a day, taking care of homey stuff, (minus the cleaning part) lol...

Herb Chicken with Sundried Tomatoes Wrap
(Makes 2)

Ingredients
1. 2 pieces chicken fillet
(marinated night before with mixed herbs, olive oil, soy sauce)
2. 2 pieces rasher bacon
3. Handfuls of Tuscan salad leaves
4. Few sundried tomatoes
5. Cheese for topping (i use mixture of red chedder & mozarella)

Procedure
1. Marinate the chicken fillet overnight for best result.
2. Fry the chicken fillet till cooked on med fire, approximately 10mins.
3. Meanwhile, warm up the tortilla in the oven as directed.
4. Toss the salads leaves with olive & lemon mixture (1part lemon to 3parts oil).
5. After the fillet is cooked, fry up the rasher bacon till crisp.
6. Arrange fillet, bacon, sundried tomatoes & cheese topping on tortilla on a baking tray.
(Dun put the salad in as i do, later the leaves will be cooked)
7. Baked the wrap on med hot, 180C oven for 4mins, til cheese is melted.
8. Before serving, top with salad leaves & fold the tortilla in.

Saturday, October 30, 2010

Pandan Chiffon Cake 2


Tried another Pandan Chiffon Recipe on Wednesday & Thursday.
This time round, it's perfect!
The texture is perfect, the taste perfect,
even on the 2nd day, its still taste perfect!

The first i tried, i'm using recipe from here.
The chiffon then was slightly underbake, i think,
cos it had a denser bottom half and a airy light top half.
The recipe i tried this time, was from a recipe that
i bought titled "Chiffon Cake is Done" by Kevin Chai.
The entire book have nothing else but purely chiffon recipe.

Most of the recipe calls for equal number of egg yolk-white ratio,
which i like cos i dun have to waste any.
The ingredient called for are simple & always avail in my stockie.

This time, i didn use pandan essence.
Instead i use freshly blended pandan leaves for the smell & taste.
I use 1 screwpine leaf, washed, then put in blender with 2tbsp of water,
blend away like mad, till the mixture is fine enough.
Go through the liquid with a cloth sieve.
I also reduce the amount of sugar, cos mummy comment that its a tad sweet to her liking.
I adjusted the recipe to bake with my 16cm tube cake tin.
The petite size which gives me 6 generous slices is perfect for my family.
We could finish the cake in just one morning!

I did one trial cake on Wednesday night.
The cake was gobbled up by me, mum, chun & my maid 10min just out of oven.
Nothing was left, except the crumbs!! lol..
No picture was being taken, cos there's simply no time for it..
Out of oven, slice (even when its still hot), & EATEN...
everyone was particulary hungry, esp mum,
cos she hasn't had her dinner...
My maid still ask me "why never take photo ar?"
So i told her, "this one just try only"... hahaha..

The next day, after chun went out for his appointment.
I start to make another chiffon.
Its really easy to prepare the batter & bake all under an hour.
This is definately gng into my staple recipe corner.
Gng to bake one to bring to my grandma house this sunday!

Tried baking 發糕 too!
Will post my adventure with Mr Fatt later...

the top looks ugly cos i didnt use a sharp knife to seperate it!! I just shake it to release..
If u want a nice looking top, always seperate with a sharp knife in one smooth action, pressing firmly against the cake mould

Cottony soft texture of the Pandan Chiffon, even on the 2nd day

Tuesday, October 26, 2010

Homemade Yogurt


Initially thought this is a post which i'll never post.
Simply cos the recipe seems to have failed me miserably.
But..... But magic happens sometimes...
And from this experience, i can see that i'm really not a patient person. lol..

I made a batch of yogurt on last tuesday,
taste it on wednesday, & almost threw it away there & then!!
(I already threw away 2 cups of it!)
The yogurt have a very tart taste with an extreme sourish finish to it!
On Thursday, magic happens to the yogurt..
I think it have something to do with the good bacteria fermenting & sleeping....

I recall that the bacteria will be activated at the right temperature, 110F.
Any cooler, it'll be sleeping & not fermenting...
Any warmer, the bacteria will probably die off.
So the gist of making yogurt,
is just a good handy thermometer thats all.

I have do some online research bout the different method of home making yogurt.
I ty 2 differnt incubation method while fermenting the freshly made yogurt.
As of yesterday evening, the 2 sets of yogurt gives almost the same taste to me.
The only different is that one thicken more & the other is slightly more liquid.
I dunio know if its due to the container size that i use to contain the milk,
or its really the method that cause the different in thickness.
I have a feeling that its the container more then anything else.
As smaller container is better warmed throughout due to its small size.
Here's the method that i use, after reading a ton of other method.


Homemade Yogurt
(1 large bottle & 4 small bottles, pictured above)

Ingredient

1. 1.9Liter Whole Milk (cannot be skim / low fat milk)
2. 118ml Good Quality Plain Yogurt (Must have Live Cultures)

Procedure (A) (Small bottle, more firm yogurt)
1. Prepare the incubation for the yogurt.
a) I used my outdoor cooler, put a glass with warm water of 130F in the cooler & close the lid.
We wanna make the environment warm so that the culture can work the new milk.
2. Boil the glass jars that'll be used to ferment the yogurt in boiling water
to kill any bacteria for 10mins.
3. Bring the Milk to a 180F on med fire in a heavy bottom pot,
stirring occasionally to prevent milk from scorching at the bottom.
4. Turn off the heat once it reached 180F,
Allow it to cool to 110F, i put the pot in my sink filled with cold water.
Meanwhile, boil a pot of water & put aside for later use.
5. While cooling the milk, measure the starter yogurt & allow to cool slightly,
at the same time keep a close look of the cooling milk.
If the milk accidently cooled below 110F, heat up the milk slightly.
6. When the temperature is at 110F, scope some warm milk into the boil of starter yogurt,
mix till the starter yogurt is fully combined with the milk with no lumps.
7. Pour the starter yogurt mixture into the warm milk & mix thoroughly,
we wanna ensure that the starter is even spread throughout the mixture.
8. Pour the yogurt mixture into clean jars & closed them finger tips tight.
9. Place the jars into the incubators with glass of 130F warm water to maintain
the temperature inside the incubator.
10. When is the yogurt ready
Incubate the yogurt for 6-8hours, i check the water temperature,
and top up water to 130F after 4hrs as the water have cooled down slightly.
After 6-8hrs, check that the yogurt have thicken but still slightly liquid,
remove from incubator & rest in fridge for 24hrs.
11. After 24hrs, give the yogurt a good stir to stop the fermenting completely

2nd Incubation Method (Big Bottle, slightly more tart & more liquid)
1) I also try the water bath method.
Use a small cooler, line with 3 plastic bag, fill warm water of 130F in the plastic bag,
later, i'll sit my jar of yogurt inside the water bath, with the water level below my jar lids.
2)After the milk is heated up & cooled down,
fill jars with milk yogurt & check that the water temperature in the plastic bag is still 130F.
3) Incubate the yogurt for 4hrs & removed from water bath,
place in fridge & rest for 24hrs.
4) After 24hrs, taste & give the yogurt a good stir to completely stop the fermenting!
5) There'll be a layer of yellowish liquid on top of the ready yogurt,
this is perfectly alright, even commercial yogurt sometimes have that on top.
Can just stir in the yogurt & eat as normal or scope & remove.

Afternote
I got thicker yogurt using the first method,
i didnt know if its the size of the bottle or the method that i used.
The 1st method also produce yogurt less tart.

Friday, October 22, 2010

Chocolate Bundt Cake


I made a batch of homemade yogurt on Tuesday.
On Wednesday evening when I tasted it,
i thought it had all gone wrong.
The yogurt was very tart with a strong sour finish.
Anyway, i'll talk bout the yogurt making in another post.

So Yesterday, thinking that i have 2liters worth of yogurt sitting
in the fridge wasting away.
I flip thru my recipe collection with a lookout for something yogurt...
I didnt want to waste the 2l worth of milk..
And i didnt want to have to drink smoothie all the way with them.
Then i came across this beautiful Chocolate Bundt cake recipe,
which i can't recall where or when i took it down.
It calls for the use of a little sour cream.
The ingredient was simple and i have them all..

I recall that sour cream is somehow similiar & interchangeable with yogurt recipe.
And i have also read that straining the yogurt will gives u a thicker version,
somewhat like the geek style yogurt.
So i measured & scope out the yogurt & strain them with a coconut straining cloth,
which i bought to make marmalade.
And while scoping out the yogurt,
i decided to give them another try, see if ther's any changes after sitting for more then 24hrs.
To my suprise!!!!
It was no longer tart with a sourish finish!!
Instead, the whole bottle of yogurt have develope a yogurt-dy taste,
like those commercial store bought plain yogurt.
I was stunned for a second, before i scope out the rest of the 3 small bottles of try them all.
Seems that, all the yogurt have rested well enough,
and the tart sourish taste is no longer there! haha.. Wee....


Chocolate Bundt Cake

Ingredient

90g Plain Flour
28g Cake Flour
46g Valrhona Dutch Processed Cocao Powder
1 1/4tsp Baking Powder
1/4tsp salt
170g Unsalted Butter
180g Castor Sugar
2 large eggs
1tsp Nielsen-Massey Vanilla Paste
121g Homemade Yogurt (Strain to thicken)

Procedure
1. Preheat oven to 170C with low rack, grease 5" high bundt mould & set aside.
2. Shift flour, cocao powder, baking powder & salt together.
3. In another bowl, beat butter till light, around 2mins on med.
4. Add Sugar into butter & cream till light & creamy, around 4min on med-high.
5. Beat in eggs one at a time, scraping down between the addition on low-med till combined.
6. While mixing, mix vanilla paste & yogurt together.
7. Mix the Flour mixture into the batter in 3 seperate addition,
the yogurt mixture in 2 addition, alternating between the flour & yogurt mixture,
scrape down as n when necessary, on low speed til combined.
8. Pour the mixture into the greased bundt mould leaving 2" on top,
smooth the top & bake for 50mins, till a skewer test comes out clean.
9. Invert the mould & cool.


Afternote:
The cake is chocolately rich yet soft & crumbly,
doesn't have the heaty chocolate after taste after gobbling a slice of it.
The taste is somehow similiar to Peggy's Rich Chocolate cake,
except that this doesnt need chocolate chips & its not moist & not so "thick".
A perfect light tea cake for daint little tea party w a scope of vanilla ice-cream!

Wednesday, October 20, 2010

Bob's Red Mill Steel Cut Oat

After searching & calling various Cold Storage,
I have finally made it back with a packet of Steel Cut Oat.

The hunt for Steel Cut Oat starts when i'm googling for "healthy breakfast".
Came across so many different variety, so many different brekkie across different culture.
I remember watching a kiddy show on Channel 8,
thats shows sg children having a taste of working farm life in NZ.
The staple breakfast there is homecook oatmeal, with a variety of condiments.
It looks appetizing enough that i wanted to try it.

Then a few weeks back, I came across a article on Simple Bites,
featuring the different types of oats availiable.
And the different ways to cook them.
In particular, i was hook on the Brown Butter Toasted Oatmeal with Roasted Pears.
It's simple shouts "delish" to me..... I knew then i HAVE to get some of that oats.
Thus, the hunt begins....

I googled briefly online "where to buy steel cut oat in singapore".
Results are fairly simple.
"Availiable only where the ang mohs like to market..."
Which means, west side, only can try Holland, Cluny, Guthrie hse..
I pick Cluny & called them,
but they told me they didnt have it, told me to try Tanglin / Great World,
cos they have a larger Bob's Mill variety there...
Called Tanglin Market Place CS & wala!!!!

So tonight, i'm gng to go home, cook up a small batch to try.
I dunno if chun will like the taste of it.
And considering it needs cooking time of 20-30min.
I dun know if the lazy bird in me will wake up just to
prepare that for brekkie on weekdays!!
BUT, i do remember eating oats can help one lose weight,
if thats really true, maybe i will have the determination....

Looking forward to my batch of home made yogurt tonight when i get home!
Hopefully it'll firm up,
hopfully it'll not taste nasty due to use of Meiji Milk, that i dun drink.

Friday, October 15, 2010

Chewy Oat Cookie


Made a batch of Chewy Oat Cookies for brekkie on wednesday night.
Just nice i have an open packet of old-fashion rolled oat in the fridge from my granolar.
I have always like the macadamia nut cookie & oat cookie from Subway.
They're chewy, but a tad too sweet to my liking
to finish the entire cookie by myself.

After some quick research & flipping of my recipe book.
I used one of the recipe i had on hand.


Chewy Oat Cookie


Ingredients (A)
1. 110g walnut, toasted at 170C for 8mins & chopped
2. 170g unsalted butter
3. 150g light brown sugar
4. 1 egg
5. 1 tsp Madagascar vanilla paste
6. 250g old-fashion rolled oats
7. 1 cup any mixed berries or chocolate chips

Ingredients (B)
1. 100g all plain flour, shifted
2. 1/2 tsp baking soda
3. 1/2 tsp salt

Precedure
1. Preheat oven to 170Deg C
2. Beat butter & sugar till light & fluffy
3. Add egg & vanilla paste, beat till combined
4. Mix Ingredient B together lightly in a seperate bowl
5. Combine Ingredient B into sugar batter & beat till combined
6. Mix in the oats & berries
7. I use a tablespoon to scope out the batter & arrange on greased baking sheet 1inch apart,
flatten the dough slightly with thumb & bake in oven for 13mins,
till edges are slightly golden brown but the centre still white.
8. Cookie will be soft when removed from oven,
cool slightly on baking tray before removing to rack for further cooling.

Afternote:
The cookies are not too sweet & very chewy, gng to be a good staple recipe for brekkie.
Makes about 2 large containers of 2inch diameter cookie,
have to half the recipe next time if only baking for my own family.

Friday, October 8, 2010

Jam Drop Cookie w Home made Strawberry Conserve


Darling was on course for the last 2 nights,
so i have plenty of me time to myself.
Wednesday night was spend donning masks,
afterwhich i watch " The haunting of Conneticut".
Weird things started happening......

I was initally whatsappt-ing with Cel.
Then i went to shower so the conversation stop.
Happily putting body lotion while watching the movie on HBO.
Saw the adverts few days back, and i thought it'll be a good show.
15min into the movie, getting a bit scary liao.. the plot building up...
My phone beeped, its the whatsppt tone..
I didnt bother to check cos the part is getting exciting...
Another 2 beeps followed, so i check it out.
Didnt see any new messages on whatsppt.
So i thought to myself, "whatsappt must be having problems again"..
went back to movie.

After 5min pass, whatsapt beep again...
I check immediately, no new messages.... starting to get paranoid..
Another 5 min pass, whatsappt sounded AGAIN!!!!
Check, no new message.... Getting goosebumps..
Ard 10min later, whatsappt beep AGAIN!!!
Seriously getting scared liao,
so i sms darling see if he's coming home soon,
unfortunately, he says not so early.
Damn, so i switch channel,
watch some lame chinese show for 15min,
then go to bed with the lights on...
Miraculously or coincidently,
no more whatsappt beeping sound after i switch channel.. *spooky**

So yesterday, i decided to give movies a miss,
in case i got freak out again..
I knew that there's a spare package of strawberry lying ard,
and it needs to be use up soon..
Therefore, i went ahead to make Jam Drop Cookie,
with fresh home made strawberry jam..
I reduce the amt of sugar called for in my earlier post of Strawberry Jam.
The ingredient listing is pretty simple & easy to make.
I use the recipe here & modified it slightly.


Afternote:
Didnt really like the taste of the drop cookie.
Should have stick to my good old butter cookie recipe!!
Next try, Danish Cookie.

Tuesday, October 5, 2010

Home made Strawberry Jam!!


The actual reason there's a part 2 for this post,
is actually due to my own laziness.... haha
The jam was made on Sunday night,
ready by monday morning.
But, Monday, Wed & Fri is exercise day for me & chun.
I came home happily, slightly early from work.

Chun reached home earlier then i did.
He's all ready in his exercise attire, even his socks is on!!
So the evening was spend roller-blading, followed by dinner..
By the time we finish eating, there's no sunlight to speak off.
So i have to wait for tuesday before i can take photos.....
That calls for the delay of the photos,
thus the post cant be completed on monday,
BUT i was so excited of my jam,
I can't go w/o posting my adventure.... haha...

Anyway I borrowed some books from NLB during lunch on monday.
Didnt know they have a teeny winny section on canning & food preservation.
Pop by during lunch time to grab the 3 books.
Some were books that i'm looking forward to purchasing
but havent done so, cos i still have outstanding orders which were not here yet.
Since they were availiable, decided to borrowed & read thru first.

Alot of these canning & preservation books does not
comes with many colorful pages of beautiful pictures like recipe books.
Instead, i realise they have drawing as illustration,
or even just plain description with texts.
A bit disappointed with none pictured books.
So probably will not get those.

Many canning books / even internet have said not to
reduce the sugar portion in the recipe.
As sugar is one of the main ingredient that helps to preserve food,
if we do intend to keep it for a longer shelf life.
If we're just making & using it straight away,
we dun even need to go thru the water-boiling canning method.
We can simply cook & refrigerate & use it within 3-4weeks safely.
So if that's the case, we can alter the sugar ratio more flexibly.

In singapore, with the abundance of most types of fruits / veg all yr round.
Canning & food preservation will not have a big impact on our lives.
Since we have to import all the food that we eat.
It doesnt matter really that much, food prices are already high to begin with!

Enough rumbling, I started making the strawberry jam at 10pm on Sunday night!
After a few rounds of Bingo with my family, which i lose $3 btw..
I choose a relatively easy recipe that didnt require pectin.

Home Made Strawberry Jam
Ingredients
1. 3cups sliced strawberry
2. 1 cup sugar
3. 2 tbsp lemon juice (i use freshly squeeze cos i have spare lemon lying ard,
but its advisable to get those canned / bottled lemon juice for their stability)

Instruction
1. Put the jars into a soup pot & bring to vigorious boil, covering jar with at least 2' water.
2. Put all the ingredient into a non-reactive pan.
3. Melt the sugar on low heat, once sugar melted,
switch to med-high heat, keep stirring to prevent burnt strawberries til gelling stage is reached.
4. The cooking process take approximately 18min for my 3 cups sliced berries,
cooking time will varies slightly from strawberries water content, types of pan used.
5. The strawberry mixture will bubble & foam quite alot.
6. To test for gelling stage, use either a candy thermometer maintained at 220C or,
put a few drops of the hot mixture on a frozen plate, rest it for 30sec,
if it cools down to a gel-like stage, the mixture is ready,
if the mixture is still runny like water, continue to boil down the mixture & test again.
7. For my batch, i cook them for approximately 20min before
i have success with the plate test.
8. While cooking the strawbeery mixture, my jar & lids are soak in the hot water
to sterilise.
9. When the mixture is ready, fish out jar & lids with thongs.
10. Ladle the mixture into jar, leaving 1/4' headspace from the top of jam to lid,
usually this is the bottom of the screw band of the jar.
11. Make sure that the rims of the jar are clean to ensure proper sealing later.
12. Tighten band to finger tip tightness, not excessively tight,
air needs to escape from the jam during hot water canning period.
13. Lower the jar into soup pot with hot water, ensure that the jar is covered
at least 2' from top with water. Bring to vigorious boil & start timing for 10min.
14. Remove the jar & leave to cool for 12-24hrs before checking for seal.
15. To check for seal, press the middle button, it should be convex & not move at all.
16. If it does move, it means that it is not probably sealed, but the content can still be eaten.
Just refrigerate it immediately & consume content within 3-4weeks!
17. I have made approximately 300g of strawberry jam worth with above recipe.
The 2 bottles that i go thru with the hot water canning method sealed,
1 bottle sealed just 15min after taking out from the hot water,
the other bottle, when i check out the next morning, it was sealed too.
So i have no idea what time did the button pop for bottle no. 2.


Afternote:
The jam did set properly, its not excessivly runny,
i could use it to spread my bread as per conventional store bought jam.
But i feel that the jam is a tad too sweet to my liking.
For my next batch jam, i'll probably adjust the sugar ratio slightly.
Since im making it for home consumption purely,
and with the little jam that i made,
my family cld finish it within a month safely.
So unless im intending to give it as gift,
I'll continue to lower the sugar ratio and try it out.