Thursday, March 10, 2011

Cinnamon Roll


I am craving for cinnamon, dun ask me why,
cos i just crave, especially when i saw that bottle of ground cinnamon on offer!
I have been searching for a cinnamon roll recipe for some time already.
I tried making a batch on monday night,
but that batch blotched, cos i didnt have enough milk left.
So naturally on tuesday,
i refill the milk and started to make a new batch.

Due to the long waiting time for bread,
as i've said in my previous post.
I have search high n low for one that is complete-table within one day,
more specifically, within 3-4hrs after i'm off work!!!

I've came across some recipe that call for mashed potates,
but didnt want to have to waste further time on that, i skip those.
In the end, i have shortlisted a few with just simple ingredients.
I started with the recipe on Pioneerwomen, but failed on monday, all faults purely mine.
Then on tuesday, i wanted to try another one,
but then decided against it.
So eventually i went back to that original recipe.
For, it doesnt contain any eggs, thus chun's mum will be able to take it.
The roll turn out beautifully, taste close to commercial ones!
Best of all, its entirely bakable with that span of 4hrs of time i have left after work!

Cinnamon Roll


Ingredient
1. 470 HL fresh milk
2. 1/2 cup olive oil
3. 7g instant yeast
4. 4 cups plain flour (plus 1/2 cup more seperated)
5. 1/2 tsp (heaping) baking powder
6. 1/2 tsp (scant) baking soda
7. 50g soften butter (spreadable)
8. 1 cup sugar( i use a mixure of brown, castor & muscavado)
9. very generous sprinkling of cinnamon

Procedure
1. Bring the milk, sugar & olive oil in a pan to to stimmer (just before boiling point)
2. Turn off heat and let mixture cool
(i cant wait, so i put it in a cold water bath to bring down the temperature,
what we want to acheive is to create a nice n warm temp for the yeast, so lukewarm will be good)
3. Sprinkle yeast into the lukewarm mixture & let stand for 1min.
4. Meanwhile measure out 4cups of plain flour, stir mixture (should be very wet, mixture like),
leave it to rest covered for at least 1hr or until double in bulk.
5. After rising, add in the 1/2 cup flour, baking powder, baking soda & salt.
6. Transfer dough to floured surface & knead for 2-3mins.
7. Roll out the dough into a rectangle.
8. Spread the soften butter all over the dough, leaving 1" space at the furthest long side of the dough, the side that the roll ends.
9. Sprinkle the 1 cup of sugar evenly & sprinkle generous amount of cinnamon.
10. Roll the dough from the nearest end as tight as possible, at the end of the roll, pinch the seams to seal the ends.
11. Using a long strand of dental floss, cut the roll with a criss-cross action.
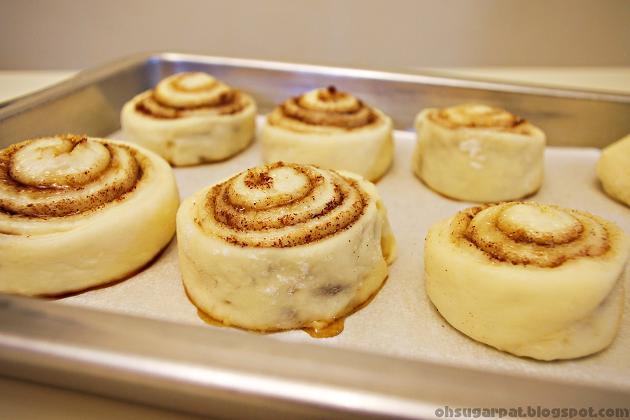
12. Pleace the cut rolls on baking tray line with baking paper, let roll rest for another 30-45min, or until it puff up to almost double in size.
13. Bake in a preheated oven at 180C for 17 mins, or till golden brown on top.
14. To make the glaze, combine 1/2cup icing with 1tbsp melted butter & 3 tbsp milk, beat the mixture till thick but still pourable.

a little variation, with mini choco chips


Note:
The individual roll bake faster at 17min, while those i laid in cake tin bake slightly longer for around 25min. Muscodavo sugar also causes e sugar to melt during the rising prior to baking, the 2nd time i tried w/o that sugar, didnt melt that much. If drizzling glaze, i'll reduce the sugar content within the roll.


Afternote:
The roll is very soft on the first night, the next morning it's still soft, on the second morning, it's considerably harder, but still ok.

Tuesday, March 8, 2011

Herb Garlic Knot


Made these knot last friday.
I was on MC that day, thus explains the time i have to kill, lol..
Was pretty bad with flu.
But still it didnt deter me from making those lovely bread.

It have been a long time since i made bread.
Cos of the time constrain mainly.
In my Uni days, i still have days without classes thus the time for bread.
The best part of making bread is the shaping part,
& after that seeing the dough rise to a puffy & yellowish white tender beautiful roll.
The puffing is so magical, the outcome never fail to amaze me still.
I love to see the rolls/bread puff up, don't ask me why, i just do.

This recipe doesnt need much kneading,
actually no kneading is required!
Just mix the ingredient, leave it to poof,
then punch down and cut into segments, roll into long strips and make the knot.
Leave it to poof again and brush with prepared butter & bake & wala!!!

Herb Garlic Knot

Ingredients
1. 480g bread flour
2. 1 tbsp sugar
3. 2 tsp (7g) instant yeast
4. 11/4 tsp salt
5. 2tbsp (30ml) olive oil
6. 60ml milk
7. 1cup + 2 tbsp (270ml) lukewarm water

Glaze:
1. 2 clove garlic
2. 42g butter
3. 1/2 tsp italian herbs
4. 1/2 tsp dried basil leaves

Procedure
1. To make dough, in a mixer bowl fitted with paddel attachment,
2. Combine the wet ingredient (Olive oil, water, milk) into the dry ingredient with
the paddel attachment on med speed for 8min.
3. Transfer the dough to an oiled bowl with enough space for it to rise & double,
cover with clingflim and let rise for 1hr or until double in bulk.
4. Punch down on the dough and transfer to a lightly floured surface.
5. Divide the dough equally into 8 pieces.
6. With each pieces, roll it between your palm and the table till 10" long rope.
7. Make sure that the rope like dough is sufficiently floure so that they dun stick,
tie a knot with the rope, tuck both ends into the middle of the dough.
8. Repeat the remainding segment and let dough rest for another 45mins.
9. Meanwhile prepare the glaze by mincing the garlic and mix into melted butter with herbs.
10. Brusht eh glaze on the dough after 45min of resting,
bake in preheated oven for 15min at 170C & 3min ar 180C.


Afternote
the bread is not the usual soft sweet bread we normally eat in asia.
The texture is more towards bagel, moderately hard bread that is suitably for dipping or sandwich. Dun think i'll like to eat it as itself, but as a sandwich bread it tastes great with
slight hint of garlic and herbs.

Wednesday, March 2, 2011

Happy Pasta for 1


This is mainly what i've been having for the past 2 weeks.
Of course not everyday,
but these ingredients are sitting ready in my fridge.
And i cook myself up these lovely pasta whenever i want.
My maid have been having it easy lately,
doesn't need to prepare dinner.
I prep & cook it myself.
(But she does the washing)

Someone taught me this recipe.
We didnt even need tomato sauce for this!
The base for the sauce is fresh tomatoes.
Just shopped and stewed on a pan, mixed with plenty of aromatic basil.

I love this recipe,
for we can easily use any ingredient we have in the fridge.
It's a fairly simple recipe that calls for anything u loved to go with any type of pasta.
Initially i'm having this will tagliatette, then i tried fussili.
I still prefer the former, guess i'll try it with spagetti next time.

The steps are easy peasy,
I used mushroom, hell lots of them (portabella or button),
baby asparagus, capsicum (i like red ones) , baby carrot (so cute & sweet).
All slice or diced.
Then for 1 person, i dice up one large tomato.
Cook the pasta according to instruction,
while sauting the mushroom, carrot & capsicum.
Cook the diced tomatoes with a pinch of basil or italian herbs,
top up with asparagus, cook till the tomato is soft and easily mashed.
Mixed all the cooked ingredient together, viola!

Slice / diced all ingredients
Cooked diced tomato til soften & easily mashed

Saturday, February 26, 2011

Mini Blueberry Yogurt Muffin


Last week, i bought a box of blueberries from Chile.
So that i can have a hearty granolar breakfast with the so-thought sourish berries.
Been missing the self picked blueberries that i had for breakfast
while i'm staying with Gerd at Sweden.
Those small yet power pack delicious sourish berries that
she handpicked them in the summer behind her house and freeze for use during winter.
She make swedish pancake for us during one dinner,
and we had handpicked blueberries, cloudberries, homemade rhubarb & lingon berry jam
to go with the pancakes!!! Absolutely D-E-L-I-C-I-O-U-S!!
To further side track, i love love love the pink homemade rhuberb lemonade!! ahhh...

Back to my own store bought blueberries.
The berries that i bought are called blueberries, no mistake.
But they so absolutely doesnt taste like what i had in Sweden.
Firstly, they're NOT sourish at all, not a tint at all!
They're big and plump, unlike the skinny wild blueberries.
Instead, i think i taste a hint of sweetness in it.
I dunno is its due to the different species,
what i bought was called 'Southern Sun' from Chile.
So, i don't really like it with my yogurt nor with my granolar...
So instead i made them into muffin for today's breakfast.

Didnt have enough berries to make a standard 12 muffin,
so i make them into mini muffin.
This time round, i didnt use the staple muffin recipe that i love from Nigella.
Instead i tried a new recipe from a book that my colleague got for my bday last yr!
It didnt turn out too bad.
The muffin is soft and fluffy with a sticky top developed overnight.
BUT, it turns out that the blueberries baked, is nothing short of nice.
Maybe its due to the sweetness of the berries.
You dun get the usual sourish taste from the fruit while eating the muffin.
Maybe this will be a good species for baking.
I still miss the smallish sour berries that i had for dinner
and a few days for breakfast, exactly a month back!


Mini Blueberry Yogurt Muffin

Ingredients

1. 180g Plain flour
2. 1tsp Baking powder
3. Pinch of salt
4. 125g Unsalted butter, soften
5. 100g sugar
6. 1 tsp lemon zest
7. 2 egg
8. 90g yogurt
9. 150g blueberries

Precedure
1. Preheat oven to 180C.
2. Conbine flour, baking powder & salt in a bowl, put aside.
3. Mix butter and sugar till pale & creamy on med-high setting.
4. Mix in the eggs, one at a time till just combined.
5. Mix in the dry ingredient on slow setting.
6. Add in the blueberries by hand.
7. Transfer to miffin pan line with linear, fille ach muffin holes to 3/4 full.
8. Bake for 20-25min, til golden brown and cooked through.

Wednesday, February 16, 2011

Chocolate Chips Cookie


Its been exactly 2 months since my last post.
Alot of happen & taken place during these 2 months.
I went on a mind-changing or better said, self-engaging trip to the far far North.

Trying hard to get back on track to my baking routine.
Life resume after all the hu ha of holidays & CNY doesnt it??
This is the 1st yr since my poly days that i have not baked
pineapple tarts & other goodies for my dear family.
I apologize for failing to keep this up this yr.
This is an exceptionally contridicting year for me.
Had wanted to make almond tuiles when i came back on the 3oJan,
but was seriously jet-lagged and simply not in the correct mind to bake.

These Chocolate Chip Cookies are bake specially for xmas last year.
I try to get back the 'original' taste of these cookies.
These are actually the first few items i bake when i started out baking in my sec sch days.
Bought back the same flour, which i'm not using right now, specially for this batch.
Used back the same brand of butter, the same brand of choco chips.
I gave most of them away, to people whom are special & dear to me.
My mum & james loved the macadamia cookies.
I still have hell lots of mac nuts, have to bake another batch to finish them up soon.

This is a very very simple recipe,
the basic of chocolate chip cookies.
Nothing special or unique used for these cookies.
Its the mind & heart of the baker that makes the real diffference,
not the recipe.
I always enjoy the crunchiness, the aroma, the bite
& probably the memories that these cookies had for me.
I hope everyone could enjoy the simple pleasure & happiness
that this simple recipe brings!


Chocolate Chip Cookies

Ingredients
1. 500g Self-raising Flour
2. 320g Butter
4. 200g Sugar
5. 1/2 tsp Baking soda
6. Pinch of salt
7. 2 eggs

Procedure
1. Preheat oven to 180C.
2. Cream butter & sugar till creamy, add eggs & continue to mixed.
3. Combine with flour, salt & baking soda.
4. Bake the dough for 10mins depending on size.

*add in chocolate chips, nuts, cocao powder as required.